Obtaining the Java Development Kit

Now that the theoretical underpinning of Java has been explained, it is time to start writing Java programs.

Click here To Know More On JAVA


Before you can compile and run those programs, however, you must have a Java development system installed on your computer. The one used by this book is the standard JDK (Java Development Kit), which is available from Sun Microsystems. Several other Java development packages are available from other companies, but we will be using the JDK because it is available to all readers. It also constitutes the final authority on what is and isn’t proper Java. At the time of this writing, the current release of the JDK is the Java 2 Platform Standard Edition version 5 (J2SE 5). Because J2SE 5 contains many new features that are not supported by earlier versions of Java, it is necessary to use J2SE 5 (or later) to compile and run the programs in this book.


The JDK can be downloaded free of charge from www.java.sun.com. Just go to the download page and follow the instructions for the type of computer that you have. After you have installed the JDK, you will be ready to compile and run programs.


The JDK supplies two primary programs.
  1. The first is javac.exe, which is the Java compiler.
  2. The second is java.exe,which is the standard Java interpreter, and is also referred to as the application launcher.
One other point: the JDK runs in the command prompt environment. It is not a windowed application. In order to Understand how to install JDK for eclipse check below link

How to Install JDK For Eclipse


How to Convert String to Date in Java


This is the second part of the article which I have started around date and String in Java. In the first part we have seen about converting a java.util.


Check Here For How To Convert date To String In JAVA


Date object into String format and in this part we will see the other way around. Means you have String in any date format e.g. yyyyMMdd 20110924 and you want to create a java.util.Date object from that. We will list steps to convert String into Date in Java and then we will see different examples with different date formats e.g. ddMMyy or dd-MM-yyyy.


You can check the java doc of DateFormat for all the symbols it supports and what is meaning for that but here I am listing some common points which is worth remembering while working with SimpleDateFormat for conversion.


1) Confusion between “m” and “M”, small case “m” represent minutes while “M” represent Month Also “d” represent date in month while “D” represent Day of week. This is most common cause of error while converting String to date and back date to string. In shot ddMMyy is not equal to DDmmyy.


2) SimpleDateFormat is not thread-safe. They are not synchronized so its better you create separate SimpleDateFormat for each thread to avoid any race condition while parsing.

How to Convert Date to String in Java


Some times we need to convert java.util.Date to string in java may for displaying purpose I need it that while working on displaytag then I thought about this article to list down various way of converting this in various ways, after some reading I found that SimpleDateFormat makes this quite easy. To get the feel of Date API in java and to familiarize ourselves with these classes we will see different examples of converting date to String in our application. Both DateFormat and SimpleDateFormat class belongs java.text package and they are very powerful and you can use them for conversion. It is also good for parsing string into date and can be used to show in various locale also.


Its very easy with the use of SimpleDateFormat, here are the exact steps:


convert date to string, simpleDateFormat in Java


1) First step is to create a date format using SimpleDateFormat class


2) Call format() method of SimpleDateFormat by passing Date object this will return String representation of date into specified date format.


For complete details on available symbols for date conversion you can check java doc of DateFormat and SimpleDateFormat class. Here are some important points about SimpleDateFormat which is worth remembering


1)Common point of confusion between “m” and “M” , small case “m” represent minutes while “M” represent Month Also “d” represent date in month while “D” represent Day of week. This is most common cause of error while converting String to date and back date to string. In shot ddMMyy is not equal to DDmmyy.


2)It’s also worth noting that SimpleDateFormat are not thread-safe. They are not synchronized so its better you create separate DateFormat for each thread to avoid any race condition while parsing date in java.


It’s very important for any java developer be it senior or junior to get familiarize himself with Date, Time and Calendar API. SimpleDateFormat is an excellent utility for converting String to Date and then Date to String but you just need to be little careful with format and thread-safety .

How to String Split Example in Java

I don't know how many times I have split ed String in Java. Split is very common operation given various data sources e.g CSV file which contains input string in form of large string separated by comma. Splitting is necessary and Java API has great support for it. Java provides two convenience methods to split strings first within the java.lang.String class itself: split (regex) and other in java.util.StringTokenizer. Both are capable to split the string by any delimiter provided to them.


split string example in JavaIn this article we will see how to split string in Java both by using String’s split() method and StringTokenizer. If you have any doubt on anything related to split string please let me know and I will try to help.


Java Program to print Prime numbers in Java


How to print Prime numbers in Java or how to check if a number is prime or not is classical Java programming questions, mostly taught in Java programming courses. A number is called prime number if its not divisible by any number other than 1 or itself and you can use this logic to check whether a number is prime or not. This program is slightly difficult than printing even or odd number which are relatively easier Java exercises. This Simple Java program print prime number starting from 1 to 100 or any specified number. It also has a method which checks if a number is prime or not.


Here is complete sample code example to print prime numbers from 1 to any specified number. This Java program can also check if a number is prime or not as prime number checking logic is encapsulated in isPrime(int number) method.


How to reverse String in Java using Iteration and Recursion

Here is code example String reverse using iterative and recursive function written in Java. Recursive solution is just for demonstrative and education purpose, don’t use recursive solution in production code as it may result in StackOverFlowError if String to be reversed is very long String or if you have any bug in your reverse function, anyway its good test to make yourself comfortable with recursive functions in java.


Variables in Java

The variable is the basic unit of storage in a Java program. A variable is defined by the combination of an identifier, a type, and an optional initializer. In addition, all variables have a scope, which defines their visibility, and a lifetime. These elements are examined next.

Declaring a variable

In Java, all variables must be declared before they can be used. The basic form of
a variable declaration is shown here:

type identifier [ = value][, identifier [= value] ...] ;

The type is one of Java’s atomic types, or the name of a class or interface. (Class and interface types are discussed later in Part I of this book.) The identifier is the name of the variable. You can initialize the variable by specifying an equal sign and a value. Keep in mind that the initialization expression must result in a value of the same (or compatible) type as that specified for the variable. To declare more than one variable of the specified type, use a comma-separated list.

Here are several examples of variable declarations of various types. Note that some
include an initialization.


int a, b, c; // declares three ints, a, b, and c.
int d = 3, e, f = 5; // declares three more ints, initializing // d and f.
byte z = 22; // initializes z.
double pi = 3.14159; // declares an approximation of pi.
char x = 'x'; // the variable x has the value 'x'.


Dynamic Initialization of Variable

Although the preceding examples have used only constants as initializers, Java allows variables to be initialized dynamically, using any expression valid at the time the variable is declared.

For example, here is a short program that computes the length of the hypotenuse of a right triangle given the lengths of its two opposing sides:


// Demonstrate dynamic initialization.
class DynInit {
public static void main(String args[]) {
double a = 3.0, b = 4.0;
// c is dynamically initialized
double c = Math.sqrt(a * a + b * b);
System.out.println("Hypotenuse is " + c);
}
}


Here, three local variables—a, b,and c—are declared. The first two, a and b, are initialized by constants. However, c is initialized dynamically to the length of the hypotenuse (using the Pythagorean theorem). The program uses another of Java’s built-in methods, sqrt( ), which is a member of the Math class, to compute the square root of its argument. The key point here is that the initialization expression may use any element valid at the time of the initialization, including calls to methods, other variables, or literals.


Rules that must be followed when naming variables or errors will be generated and your program will not work:


  • No spaces in variable names

  • No special symbols in variable names

  • Variable names can only contain letters, numbers, and the underscore ( _ ) symbol

  • Variable names can not start with numbers, only letters or the underscore ( _ ) symbol (but variable names can contain numbers)


The Scope and Lifetime of Variables

However, Java allows variables to be declared within any block. As explained above, a block is begun with an opening curly brace and ended by a closing curly brace. A block defines a scope. Thus, each time you start a new block, you are creating a new scope. As you probably know from your previous programming experience, a scope determines what objects are visible to other parts of your program. It also determines the lifetime of those objects. Most other computer languages define two general categories of scopes: global
and local. However, these traditional scopes do not fit well with Java’s strict, objectoriented
model. While it is possible to create what amounts to being a global scope, it is by far the exception, not the rule. In Java, the two major scopes are those defined by a class and those defined by a method. Even this distinction is somewhat artificial. However, since the class scope has several unique properties and attributes that do not apply to the scope defined by a method, this distinction makes some sense. The scope defined by a method begins with its opening curly brace. However, if that method has parameters, they too are included within the method’s scope.As a general rule, variables declared inside a scope are not visible (that is, accessible)
to code that is defined outside that scope. Thus, when you declare a variable within a scope, you are localizing that variable and protecting it from unauthorized access and/or modification. Indeed, the scope rules provide the foundation for encapsulation. Scopes can be nested. For example, each time you create a block of code, you are creating a new, nested scope. When this occurs, the outer scope encloses the inner scope. This means that objects declared in the outer scope will be visible to code within the inner scope. However, the reverse is not true. Objects declared within the inner scope will not be visible outside it.
To understand the effect of nested scopes, consider the following program:


// Demonstrate block scope.
class Scope {
public static void main(String args[]) {
int x; // known to all code within main
x = 10;
if(x == 10) { // start new scope
int y = 20; // known only to this block
// x and y both known here.
System.out.println("x and y: " + x + " " + y);
x = y * 2;
}
// y = 100; // Error! y not known here
// x is still known here.
System.out.println("x is " + x);
}
}


As the comments indicate, the variable x is declared at the start of main( )’s scope and is accessible to all subsequent code within main( ). Within the if block, y is declared.Since a block defines a scope, y is only visible to other code within its block. This is why outside of its block, the line y = 100; is commented out. If you remove the leading comment symbol, a compile-time error will occur, because y is not visible outside of its block. Within the if block, x can be used because code within a block (that is, a nested scope) has access to variables declared by an enclosing scope. Within a block, variables can be declared at any point, but are valid only after they are declared. Thus, if you define a variable at the start of a method, it is available to all of the code within that method. Conversely, if you declare a variable at the end of a block, it is effectively useless, because no code will have access to it. For example, this fragment is invalid because count cannot be used prior to its declaration:


// This fragment is wrong!
count = 100; // oops! cannot use count before it is declared!
int count;


variables are created when their
scope is entered, and destroyed when their scope is left. This means that a variable
will not hold its value once it has gone out of scope. Therefore, variables declared
within a method will not hold their values between calls to that method. Also, a
variable declared within a block will lose its value when the block is left. Thus, the lifetime of a variable is confined to its scope.
If a variable declaration includes an initializer, then that variable will be reinitialized each time the block in which it is declared is entered


// Demonstrate lifetime of a variable.
class LifeTime {
public static void main(String args[]) {
int x;
for(x = 0; x < 3; x++) { int y = -1; // y is initialized each time block is entered System.out.println("y is: " + y); // this always prints -1 y = 100; System.out.println("y is now: " + y); } } }


The output generated by this program is shown here:


variable-scope-in-java

As you can see, y is always reinitialized to –1 each time the inner for loop is
entered. Even though it is subsequently assigned the value 100, this value is lost.
One last point: Although blocks can be nested, you cannot declare a variable to have
the same name as one in an outer scope. In this regard, Java differs from C and C++.
Here is an example that tries to declare two separate variables with the same name. In Java, this is illegal.


// This program will not compile
class ScopeErr {
public static void main(String args[]) {
int bar = 1;
{ // creates a new scope
int bar = 2; // Compile-time error – bar already defined!
}
}
}

Creating First Hello World Application In JAVA

In case of each programming languages like c,c++,php etc we all begin by writing hello world program.So lets begin by writing a hello world program in java.Here i will explain the steps required to write a "Hello World" program in java.


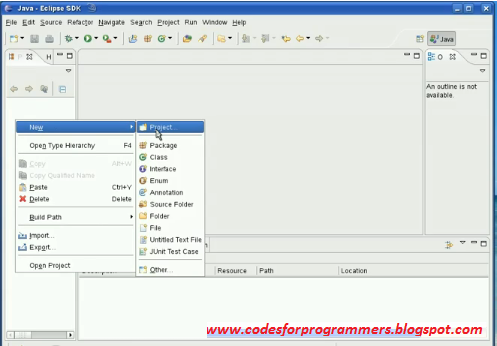
  • Then double click on the eclipse shortcut and now you will get a screen of eclipse editor window opened.On the left side of the editor you can view the project explorer.From the project explore right click and then click add a new project shown below
Create-a-project-halloworld
  • Then you will get a new window where we need to mention the name of the new java project.Once you fill the project name click finish button to create the sample project as shown below
Create-a-javaproject-halloworld
naming-the-project-in-java

  • Now a sample folder structure is formed named Hello world.Now there is a file named helloworld.java.Right click on that file and add new class to it as shown in figure
  • Then you will be navigated to a window to specify the name of the class which you are goin to create as below
naming-the-class-for-java
  • Once you mention the class name click finish to create that class.Also you can specify whether class is private,public or protected.Click on the helloworld.Java and view the code.You can see the class you create and add system.out.println("HelloWorld"); to it and save as below.Now we need to run this as a java application.right click on the project and click"Run as a java application" as shown below.
  • Now you will get an output like this as below.
console-output-halloworld

  • So this is our first java program printing hello world.Be happy cheers!!!!!!!!!!!!!!.if you like my article please put comments.

Installing JDK For Eclipse

  • Check the www.oracle.com site to get the link to download jdk as in screencast below
Downloading-jdk-from-eclipse.com
  • Click the button to download jdk as in the screen cast

  • In the next step select the operating system for which you wanted to install.read the agreement and click on the continue button as below
select-os-for-jdkSelected-os-for-jdk

  • Then download begins and save to a location in your hard disc as below
save-the-jdk-to-a-location
  • After the download click the setup file to install jdk
click-the-setup-file-to-install-jdk
  • Then there appears a screen to change the installation directory.This is not mandatory(if you wanted to change you can do it as below)

changing-the-directory-if-needed
  • Then click the finish button.this completed the installation.now we need to verify the installation

  • Just open up a command prompt and move to installation directory and type cd bin and check for java version by giving version-v as below.If the version is shown correctly there is no doubt that its installed perfectly
check-for-installation-of-sdk

  • Also take the command prompt and check for whether the java compiler is installed at the proper path by giving javac command as below
Installation-aborted

  • This is because of missing of some of the settings.That means jdk installation path provided in the advanced system settings is wrong .Inorder to make it working properly just go to location C:\Program Files.
sdk-installation-path-verification
  • In that location there should be a folder named java and inside that java folder there should be a file with jdk version as below(If its not there the installation is a failure one.)

JDK-folder-should-be-present
  • Then go and click jdk folder and go inside the bin folder and rightclick on any of the exe files inside the bin folder and check for properties as shown below
righclick-on-the-any-of-files-in-bin
  • This is where you should tell your java to look for your compiler.So Copy that path as shown below.

Copy-the-jdk-path
  • Then Right click on My Computer and click on properties and then click on Advanced system settings as shown below
Advanced system settings in properties

  • Under Advanced system settings there is a section called environmental variables.Over there create a new variable called path and give the value as jdk path ie where jdk is(copied minits back)
Create-environmental-variable-called-path

  • Then save the settings.
Environmental variable save
  • Now go to command prompt and type javac you will get the result as shown below
Check-for-installation-of-jdk

Installing Eclipse on Windows Linux and mac

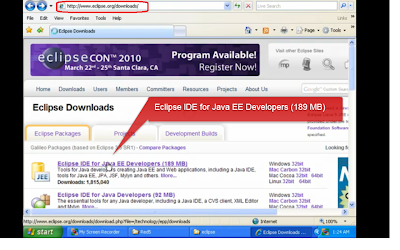
  • First Step is go to url www.eclipse.org and check for the for downloading eclipse

  • Then click on the download link as shown in figure.


Installing-Eclipse-on-Windows-Linux-and-mac
  • Once the save dialogue box is opened click the save button to save the zipped file version of eclipse into your hard drive.
Save-the-zipped-eclipse-file


  • Then extract the zip files and save into location C:\Program Files as shown in figure below

  • Once it is extracted we can see a folder directory called eclipse in your computer as below
Extract-the-eclipse-setup-files
  • Then in that folder heirarchy you can see an eclipse.exe file .Create a shortcut of that in your desktop and double click on that icon you can see eclipse opened in a new window
Eclipse-installation-step
  • This pops up with a window which asking me to set up a path where my java projects will be stored.So i put that in MyDocuments/eclipse.ie my workspace
  • saving-the-eclipse-program-pathFor testing purpose create a small project called test and inside that test create a class called


Create-a-new-project-for-testing

For testing purpose create a small project called test and inside that test create a class called test.from the folder hierarchy in eclipse i double click on the test.java file and the code fragment is as below.

Code-view-in-eclipse

To that add System.out.println("testing"); .if the project undergo proper debugging we will get testing in the console.
Console-output-tocheck-eclipse-installation
So finally have a happy programming.If you like my article please post comments.

Writing Your First Hello World Console Application in C#


In the following text, we will build our first C# application with, and then without, Visual Studio.Net. We will see how to write, compile, and execute the C# application. Later in the chapter, we will explain the different concepts in the program.


Open Notepad, or any other text editor, and write the following code:


using System;
namespace MyHelloWorldApplication
{
class HelloWorld
{
static void Main(string[] args)
{
Console.WriteLine("Hello World,Welcome to http://www.codesforprogrammers.blogspot.com/ ");
}
}
}


Save this with any file name with the extension ".cs". Example: 'MyFirstApplication.cs' To compile this file, go to command prompt and write:


csc MyFirstApplication.cs


This will compile your program and create an .exe file (MyFirstApplication.exe) in the same directory and will report any errors that may occur.
To run your program, type:


MyFirstApplication


This will print Hello World,Welcome to http://www.codesforprogrammers.blogspot.com/ as a result on your console screen. So simple, isn't it? Let's do the same procedure with Visual Studio.Net:


With Visual Studio.Net


Start Microsoft Visual Studio.Net and select File - New - Project; this will show the open file dialog. Select Visual C# Project from Project Type and select Console Application from Template. Write MyHelloWorldApplication in the name text box below and click OK.


Writing Your First Hello World Console Application in C#


Now to compile and execute your application, select Debug - Start Without Debugging or press Ctrl+F5. This will open a new Console Window with Hello World written in it. Once you press any key, the window will close,terminating the program.

Namespaces in C#


A Namespace is simply a logical collection of related classes in C#. We bundle our related classes (like those related with database activity) in some named collection calling it a namespace (e.g., DataActivity). As C# does not allow two classes with the same name to be used in a program, the sole purpose of using namespaces is to prevent name conflicts. This may happen when you have a large number of classes, as is the case in the Framework Class Library (FCL). It is very much possible that our Connection Class in DataActivity conflicts with the Connection Class of InternetActivity. To avoid this, these classes are made part of their respective namespace. So the fully qualified name of these classes will be DataActivity.Connection and InternetActivity.Connection, hence resolving any ambiguity for the compiler.


So, in the second line of our program we are declaring that the following classes (within { } block) are part of
MyHelloWorldApplication namespace.


namespace MyHelloWorldApplication
{
...
}


  • The C# namespaces have NO physical mapping as is the case in Java. Classes with same namespace can be in different folders.

  • The namespace may contain classes, events, exceptions, delegates and even other namespaces called Internal namespace.


These internal namespaces can be defined like this:


namespace Parent
{
namespace Child
{
...
}
}

Running Visual Studio 2010


When you launch Visual Studio the Microsoft Visual Studio 2010 splash screen appears.
Like a lot of splash screens, it provides information about the version of the product and to whom it has been licensed, as shown in Figure given below


Running Visual Studio 2010


The first time you run Visual Studio 2010, you see the splash screen only for a short period before you are prompted to select the default environment settings. It may seem unusual to ask those who haven ’ t used a product before how they imagine themselves using it. Because Microsoft has consolidated a number of languages and technologies into a single IDE, that IDE must account for the subtle (and sometimes not so subtle) differences in the way developers work.


If you take a moment to review the various options in this list, as shown in Figure below you will fi nd that the environment settings that are affected include the position and visibility of various windows, menus, and toolbars, and even keyboard shortcuts. For example, if you select the General Development Settings option as your default preference, this screen describes the changes that willbe applied. Next covers how you can change your default environment settings at a later stage.


Running Visual Studio 2010


A tip for Visual Basic .NET developers coming from previous versions of Visual
Studio is that they should not use the Visual Basic Development Settings option.This option has been configured for VB6 developers and will only infuriate Visual Basic .NET developers, because they will be used to different shortcut key mappings. We recommend that you use the general development settings,because these will use the standard keyboard mappings without being geared toward another development language.


Running Visual Studio 2010


Regardless of the environment settings you selected, you see the Start Page in the center of the screen.However, the contents of the Start Page and the surrounding tool bars and tool windows can vary.


Before you launch into building your first application, it’s important to take a step back and look at the components that make up the Visual Studio 2010 IDE. Menus and toolbars are positioned along the top of the environment, and a selection of sub windows, or panes, appears on the left,right, and bottom of the main window area. In the center is the main editor space: whenever you open a code file, an XML document, a form, or some other fi le, it appears in this space for editing.With each file you open, a new tab is created so that you can toggle among opened files. On either side of the editor space is a set of tool windows: these areas provide additional contextual information and functionality. In the case of the general developer settings, the default layout includes the Solution Explorer and Class View on the right, and the Server Explorer and Toolbox on the left. The tool windows on the left are in their collapsed, or unpinned , state. If you click a tool window’s title, it expands; it collapses again when it no longer has focus or you move the cursor to another area of the screen. When a tool window is expanded, you see a series of three icons at the top right of the window, similar to those shown in the left image of Figure below.


Running Visual Studio 2010


If you want the tool window to remain in its expanded, or pinned , state, you can click the middle icon, which looks like a pin. The pin rotates 90 degrees to indicate that the window is now pinned.Clicking the third icon, the X, closes the window. If later you want to reopen this or another tool window, you can select it from the View menu.


The right image in Figure above shows the context menu that appears when the fi rst icon, the down arrow, is clicked. Each item in this list represents a different way of arranging the tool window. As you would imagine, the Float option allows the tool window to be placed anywhere on the screen,independent of the main IDE window. This is useful if you have multiple screens, because you can move the various tool windows onto the additional screen, allowing the editor space to use the maximum screen real estate. Selecting the Dock as Tabbed Document option makes the tool window into an additional tab in the editor space.

Installing Visual Studio 2010


When you launch Visual Studio 2010 setup, you see the dialog in Figure 1 - 1 showing you the three product installation stages. As you would imagine, the fi rst stage is to install the product itself. The other two stages are optional. You can either install the product documentation locally, or use the online (and typically more up - to - date) version. It is recommended that you do search for service releases because it ensures you are working with the most recent version of the product and associated tools.


Installing Visual Studio 2010


As you progress through the setup process you are prompted to provide feedback to Microsoft (left image, Figure 1-2) and agree to the licensing terms for the product.


Installing Visual Studio 2010


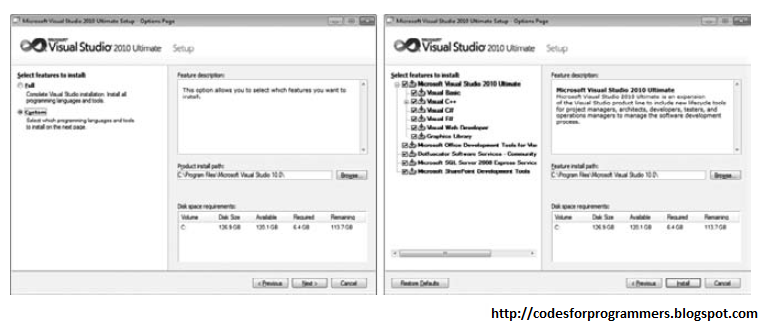
The Visual Studio 2010 setup process has been optimized for two general categories of developers: those writing managed, or .NET, applications, and those writing native, or C++, applications (left image, Figure below. The Customize button allows you to select components from the full component tree as shown in the right image of Figure below.


Installing Visual Studio 2010


Once you have selected the components you want to install, you see the updated progress dialog in the left image of Figure below. Depending on which components you already have installed on your computer, you may be prompted to restart your computer midway through the installation process.When all the components have been installed, you see the setup summary dialog in the right image of Figure below. You should review this to ensure that no errors were encountered during installation.


Installing Visual Studio 2010

ACID properties

ACID (atomicity, consistency, isolation, durability) is a set of properties that guarantee database transactions are processed reliably

Atomicity

Atomicity requires that database modifications must follow an "all or nothing" rule. Each transaction is said to be atomic if when one part of the transaction fails, the entire transaction fails and database state is left unchanged. It is critical that the database management system maintains the atomic nature of transactions in spite of any application, DBMS (Database Management System), operating system or hardware failure.

An atomic transaction cannot be subdivided, and must be processed in its entirety or not at all. Atomicity means that users do not have to worry about the effect of incomplete transactions.

Transactions can fail for several kinds of reasons:


  • Hardware failure: A disk drive fails, preventing some of the transaction's database changes from taking effect
  • System failure: The user loses their connection to the application before providing all necessary information
  • Database failure: E.g., the database runs out of room to hold additional data
  • Application failure: The application attempts to post data that violates a rule that the database itself enforces, such as attempting to insert a duplicate value in a column.

Eg:

An example of an atomic transaction is an account transfer transaction. The money is removed from account A then placed into account B. If the system fails after removing the money from account A, then the transaction processing system will put the money back into account A, thus returning the system to its original state. This is known as a rollback

Consistancy


The consistency property ensures that the database remains in a consistent state; more precisely, it says that any transaction will take the database from one consistent state to another consistent state.Looking again at the account transfer system, the system is consistent if the total of all accounts is constant. If an error occurs and the money is removed from account A and not added to account B, then the total in all accounts would have changed. The system would no longer be consistent. By rolling back the removal from account A, the total will again be what it should be, and the system back in a consistent state.


The consistency property does not say how the DBMS should handle an inconsistency other than ensure the database is clean at the end of the transaction. If, for some reason, a transaction is executed that violates the database’s consistency rules, the entire transaction could be rolled back to the pre-transactional state - or it would be equally valid for the DBMS to take some patch-up action to get the database in a consistent state. Thus, if the database schema says that a particular field is for holding integer numbers, the DBMS could decide to reject attempts to put fractional values there, or it could round the supplied values to the nearest whole number: both options maintain consistency.


Isolation


The isolation portion of the ACID properties is needed when there are concurrent transactions. Concurrent transactions are transactions that occur at the same time, such as shared multiple users accessing shared objects. This situation is illustrated at the top of the figure as activities occurring over time. The safeguards used by a DBMS to prevent conflicts between concurrent transactions are a concept referred to as isolation.


As an example, if two people are updating the same catalog item, it's not acceptable for one person's changes to be "clobbered" when the second person saves a different set of changes. Both users should be able to work in isolation, working as though he or she is the only user. Each set of changes must be isolated from those of the other users.


isolation


An important concept to understanding isolation through transactions is serializability. Transactions are serializable when the effect on the database is the same whether the transactions are executed in serial order or in an interleaved fashion. As you can see at the top of the figure, Transactions 1 through Transaction 3 are executing concurrently over time. The effect on the DBMS is that the transactions may execute in serial order based on consistency and isolation requirements. If you look at the bottom of the figure, you can see several ways in which these transactions may execute. It is important to note that a serialized execution does not imply the first transactions will automatically be the ones that will terminate before other transactions in the serial order.


Durability


A transaction is durable in that once it has been successfully completed, all of the changes it made to the system are permanent. There are safeguards that will prevent the loss of information, even in the case of system failure. By logging the steps that the transaction performs, the state of the system can be recreated even if the hardware itself has failed. The concept of durability allows the developer to know that a completed transaction is a permanent part of the system, regardless of what happens to the system later on.Durability refers to the ability of the system to recover committed transaction updates if either the system or the storage media fails.

Features to consider for durability:

  • recovery to the most recent successful commit after a database software failure
  • recovery to the most recent successful commit after an application software failure
  • recovery to the most recent successful commit after a CPU failure
  • recovery to the most recent successful backup after a disk failure
  • recovery to the most recent successful commit after a data disk failure

Database Management System

What is DBMS?


  • A DBMS is a system software package that helps the use of integrated collection of data records and files known as databases. It allows different user application programs to easily access the same database.
  • Data base management system is the system in which related data is stored in an "efficient" and "compact" manner. Efficient means that the data which is stored in the DBMS is accessed in very quick time and compact means that the data which is stored in DBMS covers very less space in computer's memory. In above definition the phrase "related data" is used which means that the data which is stored in DBMS is about some particular topic.


Components of DBMS


Database Management System


Transaction Management

  • A transaction is a sequence of database operations that represents a logical unit of work and that accesses a database and transforms it from one state to another.
  • A transition can update a record, delete (or) modify a set of records etc.

Concurrency control

Concurrency control is the database management activity of co-ordinating the actions of database manipulating process that separate concurrently that access shared data and can potentially interfere with one another.

Recovery Management

The recovery management system in a database ensures that the aborted or failed transactions create non adverse effect on the database or the other transitions.

Security Management

Security refers to the protection of data against unauthorized access. Security mechanism of a DBMS make sure that only authorized users are given access to the data in the database

Language Interface

The DBMS provides support languages used for the definition and manipulation of data in the database. The data structures are created using the data definition language commands. The data manipulation is done using the data manipulation commands.

Storage Management

The DBMS provides a mechanism for management of permanent storage of the data. The internal schema defines how the data should be stored by the storage management mechanism and this storage manager interface with the operating system to access the physical storage.

Data Catalog Management

Data catalog or Data Dictionary is a system database that contains descriptions of the data in the database (metadata). If contains information about data, relationships, constraints and the entire schema that organize these features in to a unified database.


Need For DBMS

  • Data independence and efficient access.
  • Reduced application development time.
  • Data integrity and security.
  • Uniform data administration.
  • Concurrent access, recovery from crashes.

Introduction To DatabaseManagementSystem


A database consists of four elements as given


  1. Data

  2. Relationship

  3. Schema

  4. Constraints


Introduction To DatabaseManagementSystem


Data

  • Data are binary computer representations of stored logical entities.
  • Software is divided into two general categories-data and programs
  • A program is a collection of instruction for manipulating data
  • Data exist is various forms- as numbers tents on pieces of paper,as bits and bytes stored in electronic memory or as facts stored in a persons mind


Relationship


  • Relationships explain the correspondence between various data elements

Constraints


  • Are predicates that define correct database states


Scheme


  • Schema describes the organization of data and relationships within the database
  • Schema defines various views of the database for the use of various system components of the database management system and for the application’s security
  • A schema separates physical aspects of data storage form the logical aspects of data representation
  • In database management systems data files are the files that store the database information whereas offer files, such as index files and data dictionaries, store administrative information known as metadata.

  • Data base are organized by fields, records and files.
  1. Fields: is a single piece of information.

  2. Record: is one complete set of fields.

  3. File: is a collection of records


Types of schema

  1. Internal schema: defines how and where the data are
    organized in physical data storage.

  2. Conceptual schema: defines the stored data structures in
    terms of the database model used.

  3. External schema: defines a view (or) views of the database
    for particular uses

Open Database Connectivity (ODBC)


Open Database Connectivity (ODBC) helped address the problem of needing to know the details of each DBMS used. ODBC provides a single interface for accessing a number of database systems. To accomplish this, ODBC provides a driver model for accessing data. Any database provider can write a driver for ODBC to access data from their database system. This enables developers to access that database through the ODBC drivers instead of talking directly to the database system. For data sources such as files, the ODBC driver plays the role of the engine, providing direct access to the data source. In cases where the ODBC driver needs to connect to a database server, the ODBC driver typically acts as a wrapper around the API exposed by the database server.


With this model, developers move from one DBMS to another and use many of the skills they have already acquired. Perhaps more important, a developer can write an application that doesn’t target aspecific database system. This is especially beneficial for vendors who write applications to be consumed by multiple customers. It gives customers the capability to choose the back-end database system they want to use, without requiring vendors to create several versions of their applications.


Limitations of ODBC


  1. First, it is only capable of supporting relational data. If you need to
    access a hierarchical data source such as LDAP, or semi-structured data, ODBC can’t help you.

  2. Second, it can only handle SQL statements, and the result must be representable in the form of rows and columns.Overall, ODBC was a huge success, considering what the previous environment was like.


ADO.NET


With the release of the .NET Framework, Microsoft introduced a new data access model, called ADO.NET.The ActiveX Data Object acronym was no longer relevant, as ADO.NET was not ActiveX, but Microsoft kept the acronym due to the huge success of ADO. In reality, it’s an entirely new data access model written in the .NET Framework.ADO.NET supports communication to data sources through both ODBC and OLE-DB, but it also offers another option of using database-specific data providers. These data providers offer greater performance by being able to take advantage of data-source-specific optimizations. By using custom code for the data source instead of the generic ODBC and OLE-DB code, some of the overhead is also avoided. The original release of ADO.NET included a SQL provider and an OLE-DB provider, with the ODBC and Oracle providers being introduced later. Many vendors have also written providers for their databases since.Figure below shows the connection options available with ADO.NET.


With ADO.NET, the days of the recordset and cursor are gone. The model is entirely new, and consists of
five basic objects:


  • Connection—The Connection object is responsible for establishing and maintaining the connection to the data source, along with any connection-specific information.


  • Command—The Command object stores the query that is to be sent to the data source, and any applicable parameters.


  • DataReader—The DataReader object provides fast, forward-only reading capability to quickly loop through the records.


  • DataSet—The DataSet object, along with its child objects, is what really makes ADO.NET unique. It provides a storage mechanism for disconnected data. The DataSet never communicates with any data source and is totally unaware of the source of the data used to populate it. The best way to think of it is as an in-memory repository to store data that has been retrieved.


  • DataAdapter—The DataAdapter object is what bridges the gap between the DataSet and thedata source. The DataAdapter is responsible for retrieving the data from the Command object and populating the DataSet with the data returned. The DataAdapter is also responsible for persisting changes to the DataSet back to the data source.


Advantages


  • ADO.NET made several huge leaps forward. Arguably, the greatest was the introduction of truly disconnected data access. Maintaining a connection to a database server such as MS SQL Server is an expensive operation. The server allocates resources to each connection, so it’s important to limit the number of simultaneous connections. By disconnecting from the server as soon as the data is retrieved, instead of when the code is done working with that data, that connection becomes available for another process,making the application much more scalable.


  • Another feature of ADO.NET that greatly improved performance was the introduction of connection pooling. Not only is maintaining a connection to the database an expensive operation, but creating and destroying that connection is also very expensive. Connection pooling cuts down on this. When a connection is destroyed in code, the Framework keeps it open in a pool. When the next process comes around that needs a connection with the same credentials, it retrieves it from the pool, instead of creating a new one.


  • Several other advantages are made possible by the DataSet object. The DataSet object stores the data as XML, which makes it easy to filter and sort the data in memory. It also makes it easy to convert the data to other formats, as well as easily persist it to another data store and restore it again.


ActiveX Data Objects (ADO)

Microsoft introduced ActiveX Data Objects (ADO) primarily to provide a higher-level API for working with OLE-DB. With this release, Microsoft took many of the lessons from the past to build a lighter,more efficient, and more universal data access API. Unlike RDO, ADO was initially promoted as a replacement for both DAO and RDO. At the time of its release, it (along with OLE-DB) was widely believed to be a universal solution for accessing any type of data—from databases to e-mail, flat text files, and spreadsheets.


ActiveX Data Objects (ADO)


ADO represented a major shift from previous methods of data access. With DAO and RDO, developers were expected to navigate a tree of objects in order to build and execute queries. For example, to execute a simple insert query in RDO, developers couldn’t just create an rdoQuery object and execute it. Instead,they first needed to create the rdoEngine object, then the rdoEnvironment as a child of it, then an rdoConnection, and finally the rdoQuery. It was a very similar situation with DAO. With ADO,however, this sequence was much simpler. Developers could just create a command object directly, passing in the connection information and executing it. For simplicity and best practice, most developers would still create a separate command object, but for the first time the object could stand alone.


As stated before, ADO was primarily released to complement OLE-DB; however, ADO was not limited to just communicating with OLE-DB data sources. ADO introduced the provider model, which enabled software vendors to create their own providers relatively easily, which could then be used by ADO to communicate with a given vendor’s data source and implement many of the optimizations specific to that data source. The ODBC provider that shipped with ADO was one example of this. When a developer connected to an ODBC data source, ADO would communicate through the ODBC provider instead of through OLE-DB. More direct communication to the data source resulted in better performance and an easily extensible framework. Figure above shows this relationship.

In addition to being a cleaner object model, ADO also offered a wider feature set to help lure developers
away from DAO and RDO. These included the following:

  • Batch Updating—For the first time, users enjoyed the capability to make changes to an entire recordset in memory and then persist these changes back to the database by using the UpdateBatch command.
  • Disconnected Data Access—Although this wasn’t available in the original release, subsequent releases offered the capability to work with data in a disconnected state, which greatly reduced the load placed on database servers.
  • Multiple Recordsets—ADO provided the capability to execute a query that returns multiple recordsets and work with all of them in memory. This feature wasn’t even available in ADO.NET until this release, now known as Multiple Active Result Sets (MARS).

Template by - Mathew | Mux99