Object Data Source in c#

  • Create App_Code Folder in your Project root.
  • right-click on the App_Code and select Add->Add New Item to add a new DataSet called "Sample.xsd" to the project.
  • Double click on DataSet Sample.xsd . You will get a tool box for your Data set.
  • Grab a Table Adapter control .You may see another Table Adapter as shown below .
  • Create appropriate connection string or select already created one.
  • Click Next and tick Use Sql Statements and Write a Query to select the rows.You can use the Query Builder for automatic queries and check the results there itself.
  • Rename DataTable1 to Sample (for an example) . Which renames the adapter also.
  • After successful creation of the sql query which creates a Method by default say GetData().
  • Right-click on the App_Code and select Add->Add New Item to add a new Class file called "AssignValues.cs" to the project.

    Double Click on the class and create a method in it

public class AssignValues

{
public void Fill(GridView gdv)

{
gdv.ID = string.Empty;

SampleTableAdapters.MemberTableAdapter mtadptr = null;

mtadptr = new SampleTableAdapters.MemberTableAdapter();

Sample.MemberDataTable dt=null;

dt=mtadptr.GetData();

gdv.DataSourceID=string.Empty;

gdv.DataSource=dt;

gdv.DataBind();
}

}
Explanation for the above code is given below

Grid view is an object parameter you passing it from in which event you need to fill the data.Then creating an object of Sample data set dt and filling the data into it and bind it.
After that you can make an instance of the class and call the method in any other c# code page of the Project files. Pass the parameter Grid View say GridView1 after grabbing a Grid view from the Tool Box.

Asp .net 2.0 GridView control

We all know about powerful data bound control DataGrid in ASP.NET 1.x. Despite its amazing programming interface and versatility, DataGrid has its own shortcomings.

Shortcomings of DataGrid (ASP.NET 1.x)

  • DataGrid requires you to write custom code for handling common operations like sorting, paging and manipulation of data in DataGrid
  • when bound to DataSource control can only support select operation on DataSource. Updating DataSource through DataGrid can be done only through custom ADO.NET code
  • DataGrid supports a restricted event model
  • DataGrid does not support adaptive rendering on different platforms
Above limitations apply only to ASP.NET 1.x. ASP.NET 2.0 enhanced DataGrid Control is available which overcomes some of above mentioned shortcomings

GridView Control Features
  • Enhanced data source binding capabilities (Direct interaction with DataSource with any writing any ADO.NET code)
  • Built-in support for sorting and paging functionalities
  • Improved Design time features(Smart Panel Tag)
  • Customized pager user interface with PagerTemplate property
  • Additional Column types(ImageField)
  • New Event model with support for pre event and post event operations

Adding a SqlDataSource and binding to GridView Control

Here is a method by which we can bind a database to a grid view .below code helps u a lot.

void Page_Load(object sender, EventArgs e)
{

if (!Page.IsPostBack)
{

// Binds the data

BindData();

}

}

public void BindData()
{

// you can use this line

string connectionString = myDataSource.ConnectionString;

// you can also use this line since by using the SqlDataSource it makes an entry in the
// web.config file if that is what choose to do
//string connectionString = (string)ConfigurationSettings.AppSettings["ConnectionString"];
// if you are using Enterprise Library you can also use
//string connectionString = (string)ConfigurationSettings.ConnectionStrings["ConnectionString"];

SqlConnection myConnection = new SqlConnection(connectionString);

SqlDataAdapter ad = new SqlDataAdapter("SELECT * FROM Categories", myConnection);

DataSet ds = new DataSet();

ad.Fill(ds, "Categories");

myGridView.DataSource = ds;

myGridView.DataBind();

}
You will need to set the Bound column in order to see the textin the cells of the grid view control. This can be easily done by using the Smart tag which appears when you right click on the grid view control.
For you people i have also added a Status column to show you the checkbox column feature. The Status column is a simple bit field whose value can be either 1 or 0. If you are using Access database you can choose Yes/No Column. Once you have set up all your columns and execute the page it will display something like this below


Editing in the Grid View Control

You can easily add the editing, updating, selecting, paging and sorting capabilities to your grid view control. Just add a new command column and you will be asked to add whatever functionality you desire.

If you are using the SqlDataSource to bind to the GridView control you will get most of the features by just using the SqlDataSource wizard. Since we are binding the control at runtime we need to add most of the functionality manually.

Edit Mode

The fields that are marked readonly = false will change into TextBoxes when the Row_Editing event triggers. Like DataGrid control its easy to set the fields in the edit mode.

// Editing mode

void myGridView_RowEditing(object sender, GridViewEditEventArgs e)
{

myGridView.EditIndex = e.NewEditIndex;

BindData();

}
Cancel Edit

If you don't like to edit the row you can press cancel link button which will fire the RowCancelingEdit event. The code to turn the row back to its original form is quite simple and straight forward.

// Cancel Edit Mode

void myGridView_RowCancelingEdit(object sender, GridViewCancelEditEventArgs e)
{

myGridView.EditIndex = -1;

BindData();

}
Selecting Row

Selecting row event is fired when you make a click on the select link. If you need any particular item in that row you can easily select it using the cells property

// Selecting row

void myGridView_SelectedIndexChanged(object sender, EventArgs e)
{

// This will contain the selectedValue of the row

string selectedCategory = myGridView.SelectedRow.Cells[1].Text;

}
Update Row

For Updating the row we first need to get the value from the row that is entered by the user
into the TextBox. For this purpose you can change the bound column into a Template column which will make is easier to locate the item.After changing the CategoryName column to a tem plated column we can easily use the RowUpdating event to find the Text entered by the user.

void myGridView_RowUpdating(object sender, GridViewUpdateEventArgs e)
{

GridViewRow row = myGridView.Rows[e.RowIndex];

if (row != null)

{

TextBox t = row.FindControl("TextBox1") as TextBox;

if (t != null)

{

Response.Write("The Text Entered is" + t.Text);
}
}
Paging

Paging can also be easily enabled in the grid view control. Its just like DataGrid from Asp.net 1.1. First you need to make set the allow paging property to true. And you can also set the page size. Here is a small code sample that will enable paging.
// Grid View Paging

void myGridView_PageIndexChanging(object sender, GridViewPageEventArgs e)
{

myGridView.PageIndex = e.NewPageIndex;

BindData();

}

How to suppress blank row(s) in detail section of the report?

ANSWER1

Right click over section. You can see an option Suppress (No drill down). Check that option. Hope this will solve your problem

ANSWER2

if you don't want to suppress the detail section entirely, then you'll need to use conditional suppression:
right click on the detail section left margin,
then to the right of "Suppress (No Drilldown)" left click on the "X+2" box,
a formula window will appear,
then enter the condition that should suppress the row - like "IsNull({Necessary.DetailField}) or ({Necessary.DetailField}=" ")"

ANSWER3

basically when it comes to subreports and suppression the general rule of thumb is:

1. in the header have the subreport. this subreport should set the shared variable = number of rows. all elements (fields, sections) should be suppressed in this subreport. set the subreport to "suppress blank subreport". set the header section to "suppress blank section".

2. in any section AFTER the header - so let's say the footer. put a COPY of the subreport. this subreport will display data if there is data. in the footer section set the "suppress" formula to suppress the footer section if the shared variable from the first subreport returns 0 number of rows.

ANSWER4

You still didn't provide the field name for the detial field that starts "SSR", so I'll call it {table.ssr}. Create a formula {@ssr} like this:

whileprintingrecords;
stringvar array ssr;
numbervar i;
numbervar j := ubound(ssr);

if not({table.ssr} in ssr) then (
i := i + 1;
redim preserve ssr[j+1];
if i <>
ssr[i] := {table.ssr}
);

Then go to the section expert->details->suppress->x+2 and enter:

{@ssr} = ""

ANSWER5

I set up a formula field "issueid", with this formula:

whileprintingrecords;
stringvar array issueid;
numbervar i;
numbervar j := ubound(issueid);

if not ({VSTATEHISTORY.ISSUEID} in issueid) then (
i := i + 1;
redim preserve issueid[j+1];
if i <>
issueid[i] := {VSTATEHISTORY.ISSUEID}
);

I then replaced the database view field {vstatehistory.issueid} that was originally in the Detail section with {@issueid}.

<<<>>>

Then I entered {@ssr} = "" as the formula for Suppress for the Detail section.

The end result was no detail section showing, but I also tried unchecking Suppress, and the result was the same.

ANSWER6

If this isn't possible, then use Section Suppression, using a formula. Right-click on the section and choose Format Section. Then choose the formula icon (x+2 and a pencil) for suppression.

ANSWER7

I don't have a right click option for the 'format section', but I assume you mean go into the section editor and put the expression in the x2 section there. Because I always wanted them suppressed (even though there are no contents in the section) I added a:
{table,field}={table,field}
which seemed to work
But please correct me, in the section editor for the suppress(drill down OK) if I check the box it means always supress(even if there are contents), if I click the x2 box and enter an expression, then it conditionally supressed the area based on the expression?
If this is correct is there something I did wrong in crystal by checking the box?? Some type of hidden field. BTW it's mostly footers that I have the problem with.
With this item checked it still left an area for my subreport even when the subreport is empty-no contents because it is supressed in the subreport itself.
Hopefully, if what I have done is OK, then great.
But if you wouldn't mind answering the question on supression check box and X2, I'd appreciate it as I have seen some with both the check bax checked and contents in the x2 field. I always thought why conditionally supress an item with x2 thats already suppressed with the checkbox??
Thanks again for your help!

Reporting XML data using Crystal Reports and Windows Forms

Reporting on data sources such as: MS Access, SQL Server and Oracle, is common with Crystal Reports (CR). How about XML as the data source? Well, sure, you might be wondering how to do that? Is it even possible? Well, with help of this article I’ll show you how to use the XML data source and report on it using CR.

I assume the reader has basic understanding of the Visual Studio (VS) 2005 IDE and Crystal Reports. You should also be comfortable writing code in C#. Basic understanding of XML schema and ADO.NET is desirable.

What is XML Data?

Before we see the demo, let’s get to know what XML data is! Put in simple words, XML stands for Extensible Markup Language. It is an initiative by W3C to allow the exchange of information. XML is easy to understand by both humans and computers. The information stored in XML format can work on cross platform scenarios. For example, if you have information in XML format, it is easy to share them between the UNIX and the Windows platform. The data inside an XML file is presented with user defined tags. Following is the partial listing from the sample XML file which I am using in the demo:

<CD>
<TITLE>Empire Burlesque</TITLE>
<ARTIST>Bob Dylan</ARTIST>
<COUNTRY>USA</COUNTRY>
<COMPANY>Columbia</COMPANY>
<PRICE>10.90</PRICE>
<YEAR>1985</YEAR>
</CD>

As you can see, each tag is equivalent to a row with information related to a CD. Furthermore, each column is uniquely identified as a tag. You can learn more on XML. right, let’s start with our demo and see how easy it is to report on XML data with CR and Windows Forms.

Step 1: Let’s create a Windows Application Project

If VS 2005 IDE is not already started, then you can launch the IDE by clicking on windows Start button -> All programs -> Microsoft Visual Studio 2005 -> click on icon Microsoft Visual Studio 2005. You may have others ways to lunch the IDE, such as clicking it on your desktop and so on.

  1. Click on menu File -> New-> Project… or you can press the hot key Ctrl + Shift + N
  2. From New Project dialog box select -> Visual C# -> Windows
  3. From Templates select -> Windows Application
  4. Please give a name to the application; I’ve called the project as “XMLCRReport”. You may choose a different location for storing the application files as per your preference. Please see Figure 2 for illustration of the naming process.
  5. Click on OK button to finish the process. VS 2005 will create a new project and add Form1 to it as default.


Let’s set the properties of the Form1 according to Table 1. In case the property toolbox is not visible in IDE, you may hit the F4 key to make it visible. Pease make sure to select Form1 before applying changes to properties using the property toolbox.


PropertyValue
TextSize
Reporting XML data using Crystal Reports700,300


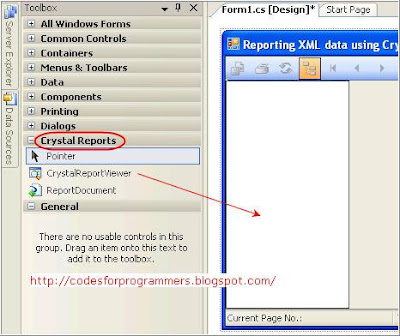
Step 2: Let’s add CrystalReportViewer to Form1

Crystal Report Viewer (CRV) control is needed for us to show the report to the user. Report Viewer gives life to your reports. Not only it lets you preview the output; it also allows you to generate the information in various popular formats (PDF, Excel, etc.). You can also take a hard copy print of the report while you are viewing the output.

You can add a CRV to the Form1 as follows:

  • Make sure Form1 is currently open in designer.
  • Drag ToolBox -> CrystalReports -> CrystalReportViewer and drop it on Form1. This step will create a new instance of CRV with the name crystalReportViewer1. You can name it as you prefer; I’ll stick with the default.

After the step 1 and step 2, your project should look similar to Figure


Step 3: Add a DataSet to the project

Although there are different ways you can get the data to CRV, I’ll show you here the DataSet technique. So, let’s go ahead and add a DataSet to the project. The following step is needed to have the DataSet added to the project:

Select Add -> New Item -> DataSet from Solution Explorer. Change the name from DataSet1 to dsCDCatalog and click the Add button. Please Cancel the TableAdapter Configuration wizard; we’ll add a DataTable using the DataSet Designer.

Let’s add the DataTable to our newly created DataSet. A DataTable is essential to load the reporting data; we’ll use the information from the DataSet/DataTable while designing the report. The following step is required to have DataTable added to DataSet (dsCDCatalog):

Double-click on dsCDCatalog from Solution Explorer; this will open the designer view. Right-click the designer surface and select Add -> DataTable. Click the header and change the name to dtCDCatalog


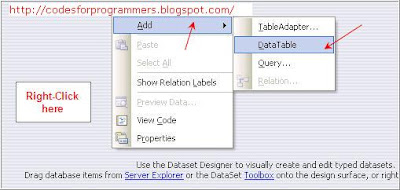
Let’s start adding columns to the DataTable (dtCDCatalog). Your designer screen should look like Figure 5. Right-click on dtEmployee and select Add -> Column to start adding the columns to the DataTable.
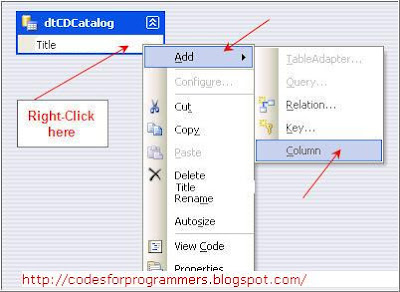
Repeat the action for the following columns:
  • Title (String)
  • Artist (String)
  • Country (String)
  • Company (String)
  • Price (Double)
  • Year (String)
As you are adding the columns, the default data type is string. Go to the Properties windows after selecting a column to change it from string to Int32. After you are done with adding columns, it should look similar to
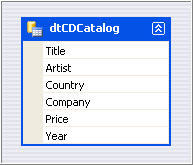
 So far we’ve created the project, and added a CRV and a DataSet. It’s time to work on the report. Following are the steps required to add Report (rptXMLData.rpt):

Select Add -> New Item -> Crystal Report from Solution Explorer. Change the name from CrystalReport1.rpt to rptXMLData.rpt and click the Add button to complete the action. A dialog box of Crystal Reports Gallery will appear. Select “As a Blank Report” option and click the OK button to complete the process to add report.

By default, you will see that rptXMLData.rpt is open for you in designer mode and its default setting. For this example I’ll make use of only Page Header and Footer. I’ll reduce the height of Report Header and Footer
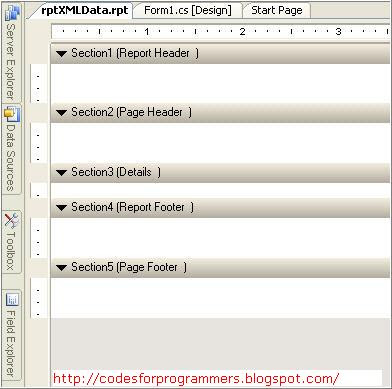
Adding a report to the project is easy. The challenge is to fill in the empty report layout. Whether this is your first report or you are a reporting junkie like me; we must deal with the most basic building blocks of the report writing. That is, the header, the detail, and the footer.

Typically, reports are designed with specific page size and layout in mind. Our report is Letter size and Portrait layout. You can explore various properties attached to the report layout by right-clicking anywhere on the open designer surface (gray area) and selecting Report and Design Properties.

It is always advisable to draw a prototype of your report on paper before you start the design process.we have the report name and report date in the header section. The body section has the employee list information; the footer carries the page numbers.


Header Section

Our header section is consists of five Text Object, two Line Object and one Special Field. Please drag and drop Text Object and Line Object from Toolbox -> Crystal Reports. You can drag and drop the “Print Date” special field from Field Explorer -> Special Fields -> Print Date. You’ll also notice that I’ve changed the color and font after placing the report object on the designer surface.
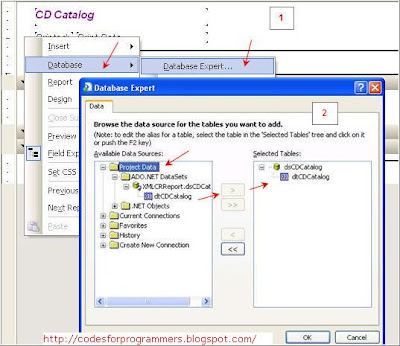
Footer Section

Footer section is simple; just one special field and one LineObject. As you’ve done with the header section, you can drag and drop a LineObject from Toolbox -> Crystal Reports. Similarly, you can drag and drop “Page N of M” special field from Field Explorer -> Special Fields -> Page N of M. Please see Figure 8 and make sure the Footer look similar.

Detail Section

The Details section of the report will have the CD Catalog list details. Now the question is: From where will we get the data? Well, as you know, at the beginning we added a DataSet to this project. We will use this DataSet as the source of data for our report.

Adding a DataSet as source of data for a report is easy. You’ll start with Right-Clicking on any open area on Report Designer -> Database -> Database Expert… As a result of this action, the Database Expert dialog box will appear. You can click on Project Data and expand the node ADO.NET DataSet. Please select the dtCDCatalog DataTable from our DataSet and click on “>” button to move it to selected tables section on right-hand side
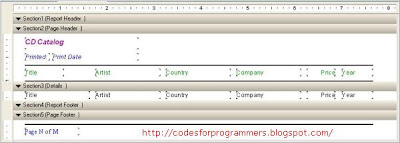
Once the report source is specified, all we have to do is drag and drop the fields from DataTable inside Detail section on report designer surface. You can drag and drop all the fields from DataTable starting with “Title” from Field Explorer inside the details section. As you drag and drop the fields inside the detail section, you’ll notice that the title of the field is also added to report designer. Since we’ve already taken care of field header, just delete the default added field header.

Step 5: C# interface code

All right; we got all we needed as report design. Please make sure to have following C# code behind Form1.cs:

using System;
using System.Collections.Generic;
using System.ComponentModel;
using System.Data;
using System.Drawing;
using System.Text;
using System.Windows.Forms;

namespace XMLCRReport
{
public partial class Form1 : Form
{
public Form1()
{
InitializeComponent();
}

private void Form1_Load(object sender, EventArgs e)
{
DataSet dsReport = new dsCDCatalog();

// create temp dataset to read xml information
DataSet dsTempReport = new DataSet();

try
{
// using ReadXml method of DataSet read XML data from books.xml file
dsTempReport.ReadXml(@"C:\articles\XmlCrystalReport\cd_catalog.xml");

// copy XML data from temp dataset to our typed data set
dsReport.Tables[0].Merge(dsTempReport.Tables[0]);

//prepare report for preview
rptXMLData rptXMLReport = new rptXMLData();
rptXMLReport.SetDataSource(dsReport.Tables[0]);
crystalReportViewer1.DisplayGroupTree = false;
crystalReportViewer1.ReportSource = rptXMLReport;
}
catch (Exception ex)
{
MessageBox.Show(ex.Message);
}
}
}
}

How to convert a decimal value of four pleces to decimal value of two places in a gridview


private void dgchkout_CellFormatting(object sender, DataGridViewCellFormattingEventArgs e)
{
try
{
if (e.ColumnIndex == 12)
{
if (e.Value == null) return; // nothing entered return

decimal value = Convert.ToDecimal(e.Value); // get the entered value - may throw an exception

e.Value = value.ToString("N2"); // format the entered value

e.FormattingApplied = true;
}
}
catch (Exception ex)
{
log.Trace("CheckOutDet:dgchkout_CellFormatting" + ex.Message);
ex.Data.Clear();
}
}

How to display decimal values in a gridview?


Our main aim to display sum total as shown in fig above

Display Sum Total in Footer of GridView Control

<asp:GridView ID="GridView1"

ShowFooter="true" DataKeyNames="ProductId"
AutoGenerateColumns="false" runat="server"
DataSourceID="SqlDataSource1">
<Columns>
<asp:BoundField DataField="Productid" HeaderText="Product Id" />
<asp:BoundField DataField="ProductName" FooterText="Total" HeaderText="Product Name" />
<asp:TemplateField HeaderText="Unit Price" FooterStyle-Font-Bold="True">
<ItemTemplate>
<%# GetUnitPrice(decimal.Parse(Eval("UnitPrice").ToString())).ToString("N2") %>
</ItemTemplate>
<FooterTemplate>
<%# GetTotal().ToString("N2") %>
</FooterTemplate>
</asp:TemplateField>
</Columns>
</asp:GridView>
<asp:SqlDataSource ID="SqlDataSource1" runat="server"
ConnectionString="<%$ ConnectionStrings:DummyDB %>" SelectCommand="Select * from Products"> </asp:SqlDataSource>
Finally, we'll use Helper functions named GetUnitPrice and GetTotal to display the UnitPrice in the ItemTemplate and Total in the FooterTemplate. For instance, for each row of the GridView, a price value is passed to the GetUnitPrice function returning variable Price

Using Helper Functions
decimal TotalUnitPrice;

decimal GetUnitPrice(decimal Price)
{
TotalUnitPrice += Price;
return Price;
}
decimal GetTotal()
{
return TotalUnitPrice;
}
if i have a number and i wanted to formatt to 5 decimals i can use the following syntax
int val = 28;

string formatted = val.ToString("N5");

Cross page posting in ASP.NET 2.0

Getting Control Values

The Page class exposes a property named PreviousPage. If the source page and target page are in the same ASP.NET application, the PreviousPage property in the target page contains a reference to the source page. (If the page is not the target of a cross-page posting, or if the pages are in different applications, the PreviousPage property is not initialized.) By default, the PreviousPage property is typed as Page.
The following code example shows how you can get the value of the TextBox1 control on the source page.

if (Page.PreviousPage != null)
{
TextBox SourceTextBox =
(TextBox)Page.PreviousPage.FindControl("TextBox1");
if (SourceTextBox != null)
{
Label1.Text = SourceTextBox.Text;
}
}
}
The FindControl method finds controls in the current naming container. If the control you are looking for is inside another control (typically, inside a template), you must first get a reference to the container and then search the container to find the control you want to get. In the following code example, the source page contains a Login control with a LayoutTemplate container that in turn contains a TextBox control named UserName. The code gets the value of the UserName control.

Getting Public Property Values from the Source Page

To get public members of the source page, you must first get a strongly typed reference to the source page.

You can do so in a number of ways. The first is to include an @ PreviousPageType directive in the target page, which allows you to specify the source page, as in this example:
<%@ PreviousPageType VirtualPath="~/SourcePage.aspx" %>
In the target page of a cross-page posting, you can also get the values of public members of the source page. The most common scenario is that the source page defines public properties and you want to get their values on the target page.
public String CurrentCity
{
get
{
return textCity.Text;
}
}
If the target page contains a PreviousPageType directive that points to the source page, you can access the source page's CurrentCity property using code such as the following
Label1.Text = PreviousPage.CurrentCity;

Bubble Sort Algorithm

Bubble sort is a simple sorting algorithm. It works by repeatedly stepping through the list to be sorted, comparing two items at a time and swapping them if they are in the wrong order. The pass through the list is repeated until no swaps are needed, which indicates that the list is sorted. The algorithm gets its name from the way smaller elements "bubble" to the top of the list. Because it only uses comparisons to operate on elements, it is a comparison sort.Bubble sort has worst-case and average complexity both О(n²), where n is the number of items being sorted. There exist many sorting algorithms with the substantially better worst-case or average complexity of O(n log n). Even other О(n²) sorting algorithms, such as insertion sort,tend to have better performance than bubble sort. Therefore bubble sort is not a practical sorting algorithm when n is large.The positions of the elements in bubble sort will play a large part in determining its performance. Large elements at the beginning of the list do not pose a problem, as they are quickly swapped. Small elements towards the end, however, move to the beginning extremely slowly. This has led to these types of elements being named rabbits and turtles, respectively

Example

Let us take the array of numbers "5 1 4 2 8", and sort the array from lowest number to greatest number using bubble sort algorithm. In each step, elements written in bold are being compared.

First Pass:
( 5 1 4 2 8 ) --- ( 1 5 4 2 8 ), Here, algorithm compares the first two elements, and swaps them.
( 1 5 4 2 8 ) --- ( 1 4 5 2 8 ), Swap since 5 > 4
( 1 4 5 2 8 ) --- ( 1 4 2 5 8 ), Swap since 5 > 2
( 1 4 2 5 8 ) --- ( 1 4 2 5 8 ), Now, since these elements are already in order (8 > 5), algorithm does not swap them.

Second Pass:
( 1 4 2 5 8 ) --- ( 1 4 2 5 8 )
( 1 4 2 5 8 ) --- ( 1 2 4 5 8 )
( 1 2 4 5 8 ) --- ( 1 2 4 5 8 )
( 1 2 4 5 8 ) --- ( 1 2 4 5 8 )
Now, the array is already sorted, but our algorithm does not know if it is completed. Algorithm needs one whole pass without any swap to know it is sorted.

Third Pass:
( 1 2 4 5 8 ) --- ( 1 2 4 5 8 )
( 1 2 4 5 8 ) --- ( 1 2 4 5 8 )
( 1 2 4 5 8 ) --- ( 1 2 4 5 8 )
( 1 2 4 5 8 ) --- ( 1 2 4 5 8 )
Finally, the array is sorted, and the algorithm can terminate.

Source Code

// array of integers to hold values
private int[] a = new int[100];

// number of elements in array
private int x;

// Bubble Sort Algorithm
public void sortArray()
{
int i;
int j;
int temp;

for( i = (x - 1); i >= 0; i-- )
{
for( j = 1; j <= i; j++ ) { if( a[j-1] > a[j] )
{
temp = a[j-1];
a[j-1] = a[j];
a[j] = temp;
}
}
}
}

Template by - Mathew | Mux99